


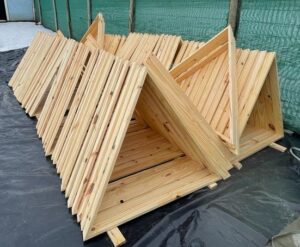
The assembly of triangles for a dome is a fundamental stage in any geodesic construction. After cutting and classifying all the wooden pieces according to the design specifications, this key phase begins—ensuring the structure’s stability, precision, and durability. Each triangle functions as a basic module that, when assembled with the others, forms the characteristic hemisphere of the dome. In this article, we’ll guide you step-by-step on how to organize the pieces, assemble the triangles, and prepare everything for the final on-site installation.
Organizing the Pieces: The First Step to Successful Assembly
Before starting the assembly, it’s essential to have all the pieces correctly labeled and sorted by type. As discussed in the previous article, the Acidome software assigns letters (A, B, C…) to each segment of the dome, simplifying identification and organization both in the workshop and on-site.
To optimize the process:
- Separate the pieces into individual stacks according to their corresponding letter.
- Ensure each wooden strip has visible, indelible markings to avoid confusion.
- Check the cutting angles of the ends: they must match the plans for perfect joints.
Assembling Geodesic Dome Triangles: A Precise, Artisanal Method
A geodesic dome’s structure consists of dozens of interconnected triangles that distribute the load and provide rigidity. In this stage, the triangles are assembled using the pre-cut angled strips. Each triangle is formed by three strips, which must be joined precisely to ensure stability and prevent future deformations.
This process ideally requires two people: one holds the pieces in position while the other secures them with screws and glue. To assemble each triangle, follow these steps:
- 🧴 Apply carpenter’s glue to each joint to reinforce the bond beyond the screws. We recommend using a trusted brand like Fortex.
- 🔩 Use 2×6 wood screws, placing two per side at an angle, with a minimum distance of 1.5 cm from the edge to prevent wood splitting. The screw’s angle should be visually coordinated with your helper for proper alignment.
- 🛠️ Tools: A cordless drill like the Bosch GSR 1000 SMART 12V with a 1.5 Ah battery for pre-drilling, and a Milwaukee M12 screwdriver to tighten the screws securely.
- 📏 Work area: Work on a flat, stable surface like the floor, with one person seated to hold the pieces and another standing with the tools.
This careful, artisanal method—repeated patiently—ensures perfectly aligned triangles, crucial for the dome’s proper fit during final assembly.
Once assembled, stack the triangles and protect them with plastic or a tarp to prevent moisture or environmental factors from warping them before final installation.
Transport and On-Site Logistics
For rural constructions, it’s often more efficient to partially or fully assemble the triangles in the workshop, where tools, covered space, and climate control are available. In this case, the workshop was in the city, and the triangles were carefully transported to the site, which had no electricity or pre-existing infrastructure.
For safe transport:
- Load the triangles into the vehicle carefully, ensuring they don’t twist or collide.
- Drive cautiously to avoid damaging the angled tips or joints, which are critical points.
We recommend printing the Acidome plan with the letter order to guide on-site placement, minimizing errors and speeding up assembly.